
A GFCI outlet, ground fault circuit interrupter, might just be the smartest electrical upgrade you make this year. These outlets protect you from electrical shocks in wet areas like bathrooms, kitchens, and laundry rooms by instantly cutting power when they detect a current leak. Installing one isn’t complicated, but it does require attention to detail and respect for electricity. This guide walks you through wiring a GFCI outlet step-by-step, from gathering tools to testing your work. Whether you’re replacing an old outlet or installing one for the first time, you’ll find everything you need here to do the job safely and correctly.
Table of Contents
ToggleKey Takeaways
- GFCI outlet wiring protects against electrical shocks by instantly cutting power when current imbalances are detected, making it essential for bathrooms, kitchens, and other wet areas.
- A single GFCI outlet can protect all downstream outlets on the same circuit when wired to the LOAD terminals, providing efficient safety coverage without multiple installations.
- Always turn off the breaker and use a voltage tester to confirm power is off before beginning GFCI outlet wiring—this simple step prevents serious injury or electrocution.
- Proper wire connections require black (hot) to brass LINE, white (neutral) to silver LINE, and ground wire to the green screw for safe, code-compliant installation.
- Test your GFCI outlet immediately after installation by pressing the TEST button to trip power and RESET to restore it, confirming the outlet functions correctly.
What Is a GFCI Outlet and Why You Need One
A GFCI outlet detects imbalances in electrical current and trips in milliseconds, faster than a standard breaker, shutting off power before serious injury can occur. This is critical near water, where the risk of shock is highest. Most modern building codes (based on the NEC, or National Electrical Code) require GFCI protection in bathrooms, kitchens, garages, crawl spaces, and outdoor outlets. Think of it as an extra layer of defense between you and a potentially deadly shock.
Two types exist: the outlet itself can be a GFCI (which protects that outlet and any downstream outlets on the circuit), or a standard outlet can be protected by a GFCI breaker in your main panel. Installing a GFCI outlet is faster, cheaper, and doesn’t require a licensed electrician in most jurisdictions. One outlet can protect an entire downstream circuit if wired correctly, making it an efficient upgrade. If you’ve had a standard outlet in a bathroom for years, replacing it with a GFCI is one of the simplest safety improvements you can make.
Tools and Materials You’ll Need
Before you turn off the breaker, gather everything so you’re not rummaging through drawers mid-project.
Materials:
• One GFCI outlet (125V, 15A is standard for most household circuits: 20A if your circuit is rated for 20A)
• Electrical tape (for insulating connections)
• Wire nuts (usually included with the outlet, but grab spares)
Tools:
• Voltage tester or multimeter (non-negotiable for safety)
• Screwdriver (Phillips and flathead)
• Wire strippers (to remove insulation from wire ends)
• Pliers (needle-nose helps in tight boxes)
• Flashlight (dark outlet boxes are the norm)
Helpful but optional:
• Outlet box extender (if the outlet box is recessed or crowded)
• Helper (an extra pair of hands can steady the outlet while you wire)
Safety Precautions Before You Start
Electricity demands respect. Before touching anything inside that outlet box, turn off the breaker controlling that circuit at your main panel. Flip the switch, then go back and test the outlet with a voltage tester to confirm power is actually off. Many electrocutions happen because someone “thought” they’d turned off the right breaker. A voltage tester costs $10 and could save your life. Wear safety glasses, wire ends are sharp. If you have wet hands, wait until they’re dry. If you feel uncertain at any point, stop and call a licensed electrician. There’s no shame in that.
Step-by-Step GFCI Outlet Installation
1. Turn Off the Breaker and Test
Locate the breaker controlling the outlet you’re replacing. Flip it off. Go back to the outlet and plug in a lamp or phone charger, it shouldn’t power on. Use a voltage tester on both the hot and neutral slots to triple-check. If the tester lights up, you’ve got the wrong breaker. Find the right one before proceeding.
2. Remove the Old Outlet
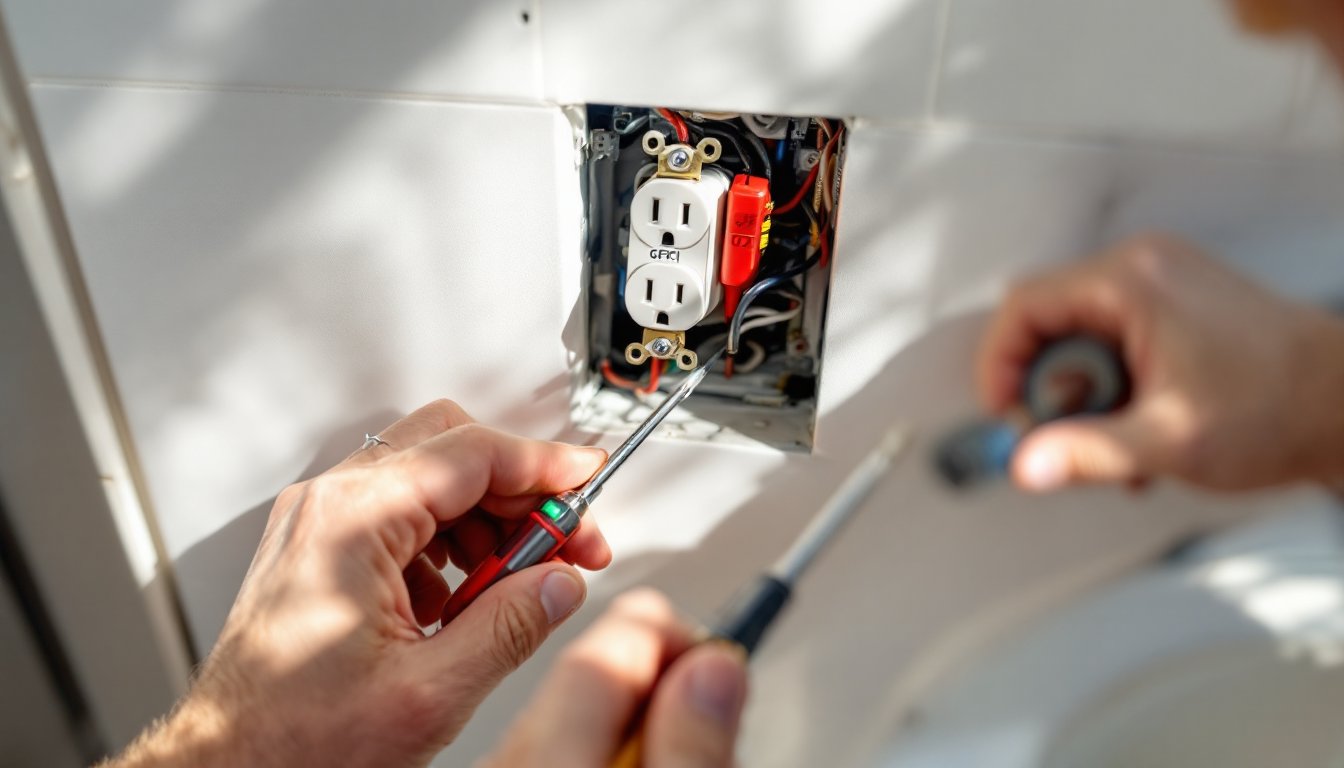
Unscrew and remove the cover plate. Unscrew the two screws holding the outlet in the box and gently pull it out. Once it’s clear of the box, loosen the terminal screws and disconnect the wires. Most outlets have a black (hot), white (neutral), and bare copper or green (ground) wire. Note which wire goes where, take a photo if it helps. If the wires are corroded or damaged, trim about half an inch off the end and re-strip them.
3. Connect the Wires to Your GFCI
GFCI outlets have brass terminals (hot), silver terminals (neutral), and a green screw (ground). They’re also marked “LINE” and “LOAD” (more on that in the next section). For now, focus on wiring the LINE terminals, these are the ones that power the outlet itself.
- Strip about three-quarters of an inch of insulation from the black (hot) wire.
- Create a small hook at the end of the wire.
- Insert it under the brass LINE terminal screw and tighten clockwise until snug, not over-tight.
- Repeat for the white (neutral) wire on the silver LINE terminal.
- Connect the bare copper or green ground wire to the green screw.
If the outlet box already has a ground wire attached to the box itself (a small green or bare wire), you can pigtail onto that using a wire nut, then connect one wire to the GFCI’s ground screw.
4. Secure the Outlet in the Box
Carefully push the outlet back into the box, keeping wires tucked neatly behind it. Screw the outlet flush against the box, it shouldn’t twist or angle. Attach the cover plate and tighten screws snugly: avoid overtightening, which can crack plastic covers.
5. Turn the Breaker Back On
Flip the breaker switch back to ON. The GFCI outlet should power on (you may hear a small click). Plug something in and confirm it works. Press the TEST button on the outlet (it should cut power) and then RESET it. If it trips and resets smoothly, you’re in good shape. If it doesn’t trip, or if the outlet won’t reset, turn off the breaker immediately and review your connections.
Wiring Multiple Outlets on the Same Circuit
One GFCI outlet can protect all downstream outlets on the same circuit, a major advantage when installing a GFCI outlet. This setup is called daisy-chaining or protecting outlets in series.
When you wire multiple outlets, the first GFCI outlet acts as the guard for the rest. Any outlet downstream (electrically speaking) will be protected without needing its own GFCI. This is especially useful in bathrooms where you might have multiple outlets but want to protect them all with a single GFCI.
How to do it:
After wiring the LINE terminals as described above, you can connect additional standard outlets to the LOAD terminals on the back of the GFCI. The LOAD terminals are marked and usually positioned below the LINE terminals. Connect hot to brass LOAD, neutral to silver LOAD, and ground as before. Then continue wiring downstream outlets to each other in series (black to black/brass, white to white/silver, ground to ground) without connecting them directly to the GFCI.
Important caveat: If an outlet is downstream of your GFCI but you don’t need it protected (rare, but it happens), don’t wire it to the LOAD terminals. Only use LOAD if all downstream outlets need protection.
For most residential circuits wiring a GFCI outlet this way is safe and code-compliant. But, check your local code or ask your inspector if you’re uncertain about your specific setup.
Testing Your GFCI Outlet and Troubleshooting Common Issues
Testing:
After installing a GFCI outlet, testing is quick. Plug a lamp into it to confirm power. Press the TEST button, the outlet should lose power and any lamp should turn off. Press RESET, power should return. If both steps work, congratulations. If the outlet doesn’t reset or won’t trip, there’s a wiring issue.
Common problems:
Outlet trips constantly but nothing is wrong. This can mean a minor ground leak elsewhere on the circuit, or the GFCI is overly sensitive (rare). Try plugging in fewer devices. If it persists, check for wet conditions near outlets and dry them out. If the problem continues, consult a licensed electrician, it might indicate a fault in another appliance or downstream outlet.
Outlet won’t power on after wiring. Double-check that you’re on the right breaker. Confirm the black (hot) wire is connected to brass LINE, white (neutral) to silver LINE, and ground to green. A reversed neutral and ground connection is the most common mistake. Turn off the breaker, fix it, and test again.
Test button is stuck and won’t pop out. The outlet may be defective. Turn off the breaker and replace it with a new one.
Always use a voltage tester before touching wires, and if you’re unsure, reach out to a licensed electrician. Installing a GFCI outlet isn’t overly complex, but electrical safety is non-negotiable. Resources like Instructables and Popular Mechanics have visual guides if you need a second reference. When in doubt, err on the side of caution, your home’s safety is worth a professional call.
Conclusion
Wiring a GFCI outlet is a practical, manageable upgrade that significantly boosts electrical safety in your home. Once you understand the basics, LINE and LOAD terminals, wire colors, and the importance of testing, the install becomes straightforward. Take your time, respect the electricity, and verify your work with a voltage tester before and after. A well-installed GFCI outlet keeps your family safer for years to come, and you’ll have the satisfaction of knowing you did it yourself.